


When I began to really delve into macro photography I quickly realized that my depth of field had dwindled away to about the thickness of a few needles. Obviously this was problematic so I did some research and discovered focus stacking. Focus stacking is a method in which there are several images of different focus points that are added together to make an image that has more depth of field. I like to relate it to a loaf of bread. Imagine a loaf of bread being very small, or each image was shot at 1.4 aperture so the depth of field would equal one slice of bread. If each image is equivalent to one slice of bread, once put into the packaging and sealed together, it makes a loaf. That’s kind of how focus stacking works. Still curious to learn more? Read on to find more about my focus stacking technique!
The image below is my starting point. I shoot with a Canon 50D as my camera. My base lens is the Canon 100mm f2.8 macro lens attached to a full set of Kenko 68mm extension tubes. I then attach a reversed Canon 50mm f1.8 to the front using a male to male thread coupler that are very inexpensive. In my small studio I like to use small mirrors that I bought at the dollar store for a dollar each for reflection that make for excellent fill. As you can see I have one directly across from the flash and I have one above the subject for some flash bounce to the top. My main light source is at the bottom of the image, a Canon 430 ex flash which is fired wirelessly and capped with a homemade diffuser made from pop cans and duct tape which in the end gives the light source a larger surface area. Purchasing a small soft box attachment for the flash will do the same thing.

Technique. Technique. How on earth do I photograph ten or more images in sequence without moving so they align properly? The secret is…I move a lot. I’m sure you were expecting that one… Onto the options of how to setup a focus stack for yourself and my method. When making a sequence of images with varying focus a tripod isn’t a necessity, but is very useful. I don’t use one when I’m in the field so I’m used to not using one when I’m inside. Also, I don’t have a focusing rail, which can make using a tripod slightly tricky without one. A focusing rail is a sliding rail that allows the camera to move smoothly across a plain, and a good one across a plain in multiple directions.
For me, I prefer to be sitting or kneeling with the table in front of me (or standing, however you can make yourself as sturdy as possible). I then put the subject, in this case it was a batch of cricket eggs I pulled out of my frog’s cage, on the edge of the table so that when I approach the subject at the minimum focal distance (focused as close to the lens as possible) I’m able to get the subject in focus while barely having any room between the lens and the table. This allows me to put a finger in front of the lens for support and also to lean it on the edge of the table or surface and push back and forth to help sturdy the focus stacking motion, which is straight forward focusing through the thickness of the subject all the way to the back. I don’t always use the entire depth of focus I capture while doing the stack because having the entire image in focus isn’t always appealing, but I capture as much as possible. Then I breath in a few rapid deep breaths to get as much oxygen I can, then hold my breath and crunch or depress my front finger forward (the one that’s at the front of the lens and on the edge of the surface) allowing me to move my depth of field slowly from the front to the back of the subject.
SUCCESS!!! Well, maybe. Using this method usually only gets me a 70% success rate from me bobbing back and forth from my heart beating. After capturing the images I load them into Lightroom and raise my black and white point so they barely exist before exporting them into the stacking program. Below is an screen shot of my Lightroom with all 44 images of the cricket egg focus stack selected. I export them as 16 bit Tiff files trying to get every bit of information out of the raw files possible before proceeding to the stacking program.

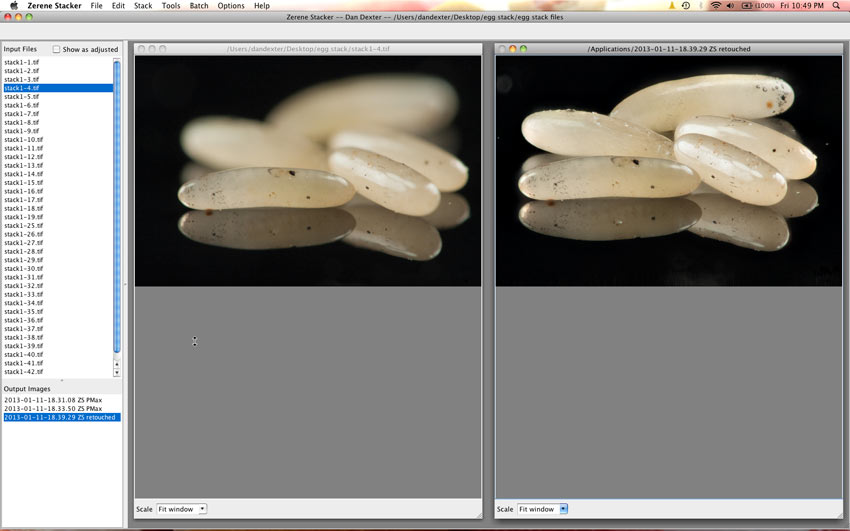
After exporting the files I import them into the stacking program that I use called Zerene Stacker. Personally this program is above Photoshop’s quality in many ways. When stacking in Photoshop, the slices are not only masked but “hidden erased”. When stacking there is much of the image that isn’t used after the part of the image that is in focus is used so Photoshop deletes much of that part of the image from the individual layers which cannot be seen in the thumbnails for the layers until fine tuned adjustments are made after the stack is finished. The image below shows Zerene Stacker’s interface after all of the images for the stack have been imported. As you can see, on the left is an example of a single frame and on the right is the finished image after I used Zerene Stacker. I prefer to use the setting Pmax in Zerene because the order of the images is not important with this algorithm as the Dmax method is. To read more on how to use the program and how to use the different methods, please visit their site, which offers a student program key for only $40. As seen below, there are two images next to each other. There is a retouching option in Zeren because no stack comes out perfect. By having two images next to each other, the best finished stack can be selected on the right and any image from the slice options will show on the left. The mouse can be simultaneously seen on both screens allowing for extremely accurate fixes of duplications in the stack or ghosting which is almost inevitable. After exporting the image from Zerene I place it in the same folder as the single stack slices and import it back into Lightroom. From there I take the image into Photoshop to adjust the image as if it were my base image from the camera.
NOTE!!! When photographing at macro magnifications, dust specs in the lens and on the sensor especially show up in the image. Keeping your lenses and sensor clean is essential to getting clean images. If there are dust spots in the images, it’s important to remove them in Lightroom before beginning the stack or the final image will be scattered with small dots that look like small shotgun bullet holes. This is because the dust spots from the senor or lens don’t move, BUT you will move if shooting freehand. These specs are then stacked together in a radius based on how much each image is offset from each other, forming the “shotgun hole” effect.
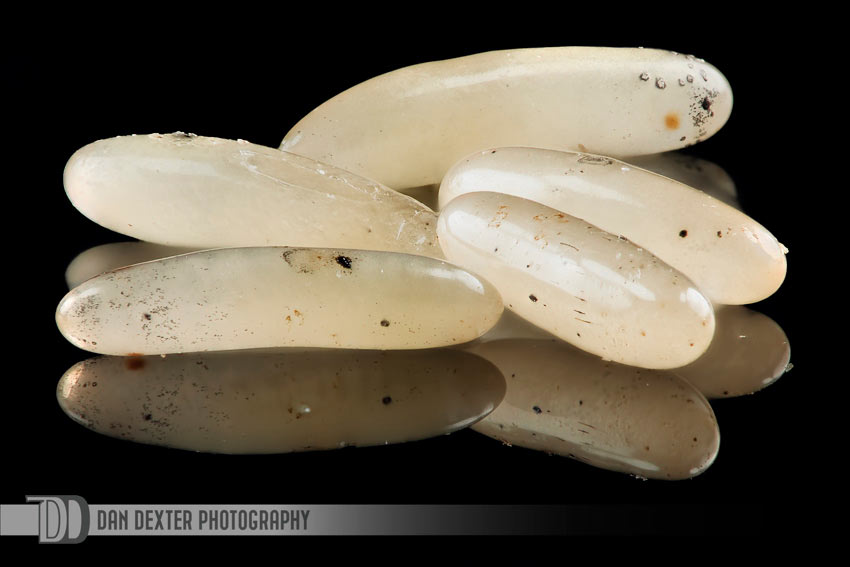
Below is the finished stack of the cricket eggs. For this image I chose to have every egg in focus because I think it’s important to see each detail on individual eggs for scientific purposes.
I hope this tutorial helps with your next macro focus stacking experience. If there’s anything you’re having issues with please comment below and I’ll do my best to answer as quickly as possible with a working solution. Good luck and keep photographing!
1 Comment on Macro Focus Stacking